openstackclient에 hypervisor servers 명령어 추가하기
1. novaclient에서 실행 테스트
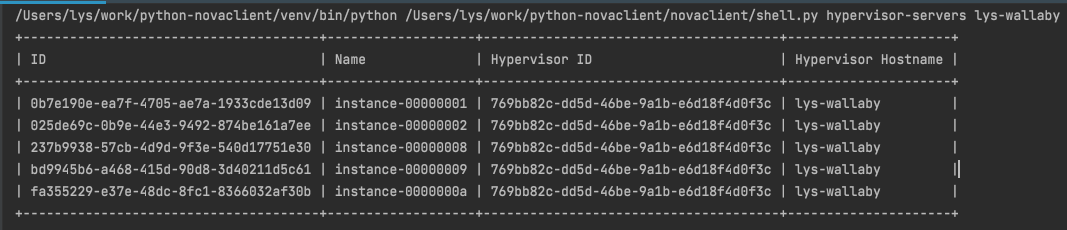
아래는 ‘nova hypervisor-servers <hostname>’ 라는 command의 결과값이다. openstack에는 여러 node이 존재하는데 어떤 node에 어떤 인스턴스들이 있는지 출력해주는 명령어 이다.
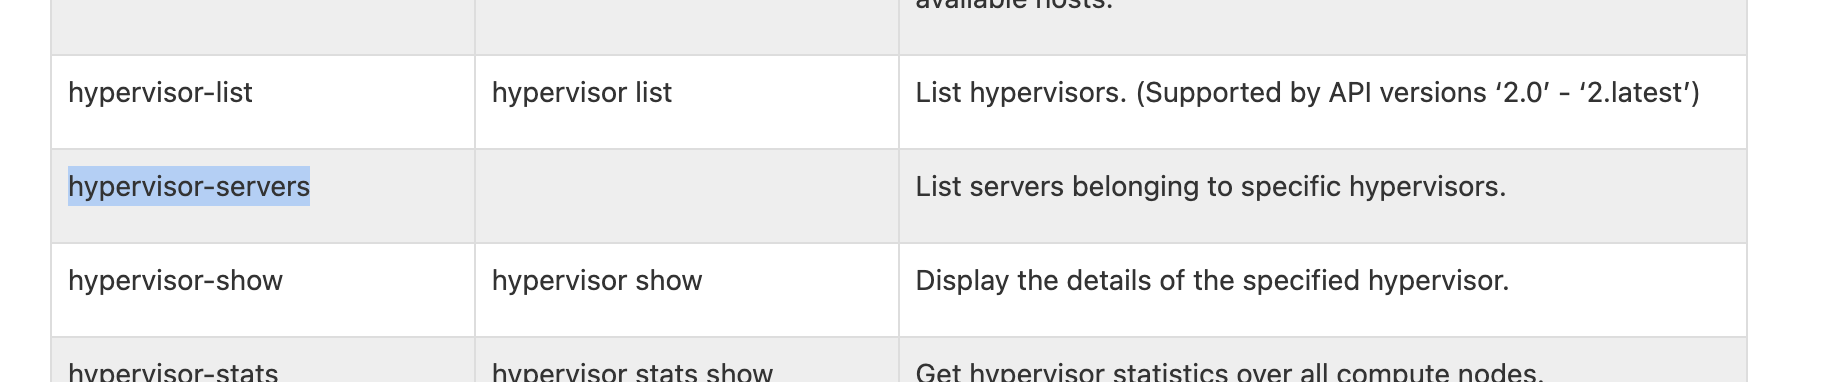
openstack command mapping guide를 보면 아래와 같이 아직 openstack client쪽에는 구현이 되지 않았다.
2. novaclient에서 hypervisor-servers를 분석해보자!
novaclient에서 명령어를 실행시켜서 디버그모드로 쭉 따라가보니
/novaclient/shell.py4036L 라인에do_hypervisor_servers라는 함수로 넘어온다. 자 하나하나씩 분석해보자!# shell.py def do_hypervisor_servers(cs, args): """List servers belonging to specific hypervisors.""" # 아래를 실행시켜보면 hypers에 내가 원하는 결과값 정보들이 담겨있다! # 여기서 F7을 눌러서 안으로 들어가보자 hypers = cs.hypervisors.search(args.hostname, servers=True)# novaclient/v2/hypervisors.py def search(self, hypervisor_match, servers=False, detailed=False): # 여기서 알 수 있는건 nova API Version에 따라 호출하는 API가 다르단걸 알 수가 있다 # novaclient에서는 현재 2.53이상인 버전을 사용중이라 /os-hypervisors API를 호출한다. if self.api_version >= api_versions.APIVersion('2.53'): url = ('/os-hypervisors%s?hypervisor_hostname_pattern=%s' % ('/detail' if detailed else '', parse.quote(hypervisor_match, safe=''))) if servers: url += '&with_servers=True' else: if detailed: raise exceptions.UnsupportedVersion( _('Parameter "detailed" requires API version 2.53 or ' 'greater.')) target = 'servers' if servers else 'search' url = ('/os-hypervisors/%s/%s' % (parse.quote(hypervisor_match, safe=''), target)) return self._list(url, 'hypervisors')그러면 최종적으로 아래와 같은 값들을 반환하여 처음에
hypers라는 변수에 값을 저장한다.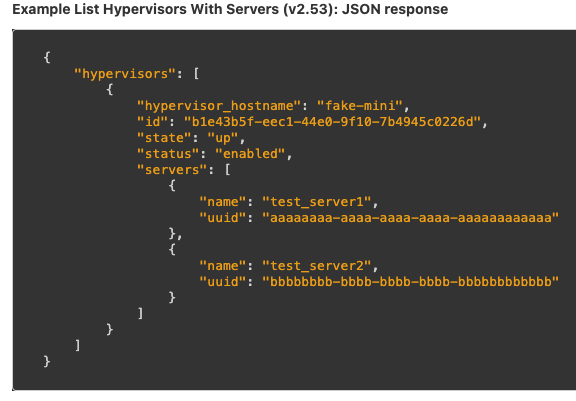
다시 shell.py 파일로 와서 나머지를 분석해보자.
# shell.py
class InstanceOnHyper(object):
    def __init__(self, **kwargs):
        self.__dict__.update(kwargs)

# Massage the result into a list to be displayed
instances = []

# 여러 hypervisor가 있을 수 있으니 값들을 하나하나씩 빼와서 instances라는 변수에 리스트형태로 저장한다.
for hyper in hypers:
    hyper_host = hyper.hypervisor_hostname
    hyper_id = hyper.id
    if hasattr(hyper, 'servers'):
        instances.extend([InstanceOnHyper(id=serv['uuid'],
                                          name=serv['name'],
                                          hypervisor_hostname=hyper_host,
                                          hypervisor_id=hyper_id)
                          for serv in hyper.servers])

# 마지막으로 필드에 맞게 값을 테이블 형태로 출력해주면 끝이난다.
# Output the data
utils.print_list(instances, ['ID', 'Name', 'Hypervisor ID',
                             'Hypervisor Hostname'])
3. openstackclient에 이제 구현을 해보자!
먼저 hypervisor 관련 명령어가 어느 파일에 있는지 찾아보았고,
/openstackclient/compute/v2/hypervisor.py에 있는것을 확인하여서 거기에 ListHypervisorServers라는 class를 생성해주었다.그리고 본격적으로 구현 하기전에 setup.cfg에 class를 등록해주자
# setup.cfg
...
hypervisor_servers = openstackclient.compute.v2.hypervisor:ListHypervisorServers
...
아래와 같이 코드를 수정하여 작성하였다.
# command.Lister를 전달해주면 나중에 테이블 형태로 출력할때 필드(ID, Name, Hypervisor ID등)가 가로로 출력이 되고
# command.ShowOne를 전달하면 필드가 세로로 출력이 된다.
class ListHypervisorServers(command.Lister):
    _description = _("List servers belonging to specific hypervisors.")

    # 이 명령어는 따로 옵션이 없어서 아래와 같이 hostname만 전달 받게 해주었다.
    def get_parser(self, prog_name):
        parser = super(ListHypervisorServers, self).get_parser(prog_name)
        parser.add_argument(
            "hostname",
            metavar="<hostname>",
            help=_("The hypervisor hostname (or pattern) to search for.")
        )
        return parser

    # 그리고 아래와 같이 self.app.client_manager.compute를 불러와서 search라는 API를 호출할 수 있게 수정하였다.
    def take_action(self, parsed_args):
        compute_client = self.app.client_manager.compute
        hypers = compute_client.hypervisors.search(
            parsed_args.hostname, servers=True)

        class InstanceOnHyper(object):
            def __init__(self, **kwargs):
                self.__dict__.update(kwargs)

        # Massage the result into a list to be displayed
        instances = []
        for hyper in hypers:
            hyper_host = hyper.hypervisor_hostname
            hyper_id = hyper.id
            if hasattr(hyper, 'servers'):
                instances.extend([InstanceOnHyper(
                    id=serv['uuid'],
                    name=serv['name'],
                    hypervisor_hostname=hyper_host,
                    hypervisor_id=hyper_id)
                    for serv in hyper.servers])

        # 필드값 추가
        columns = (
            "ID",
            "Name",
            "Hypervisor ID",
            "Hypervisor Hostname",
        )

        # 마지막으로 테이블 형태로 출력을 위해 값을 전달해준다.
        return (
            columns,
            (utils.get_item_properties(s, columns) for s in instances),
        )
이제 된거같은데? 한번 출력을 해보자
성공한거 같다!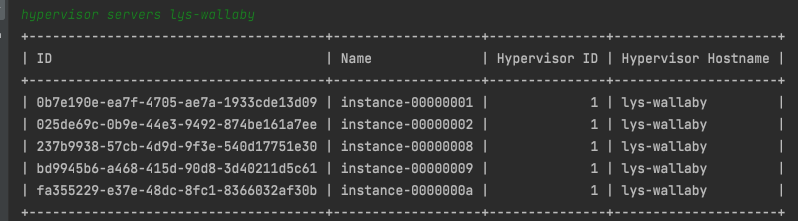
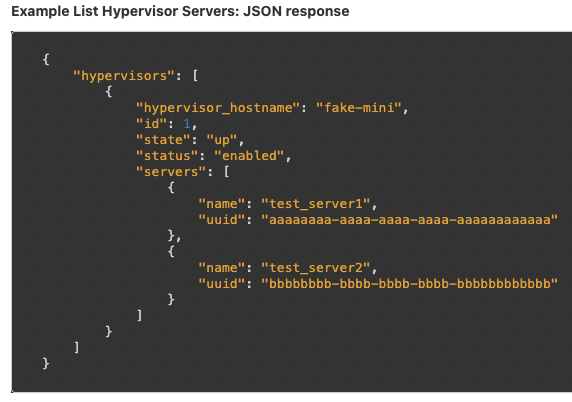
근데… hypervisor ID가 UUID형태로 떠야하는데 저렇게 뜨는 이유는 API DOC 에서 확인 할 수 있었다! nova api 가 2.53보다 낮으면 아래 api를 호출한다.

아래 예시를 보면 id가 1, 2, 3… 이런식으로 뜬다고 나와있다.
하지만 2.53부터는 아래와 같은 api를 호출하여 hypervisor ID가 UUID형태로 출력된다고 나와있다.
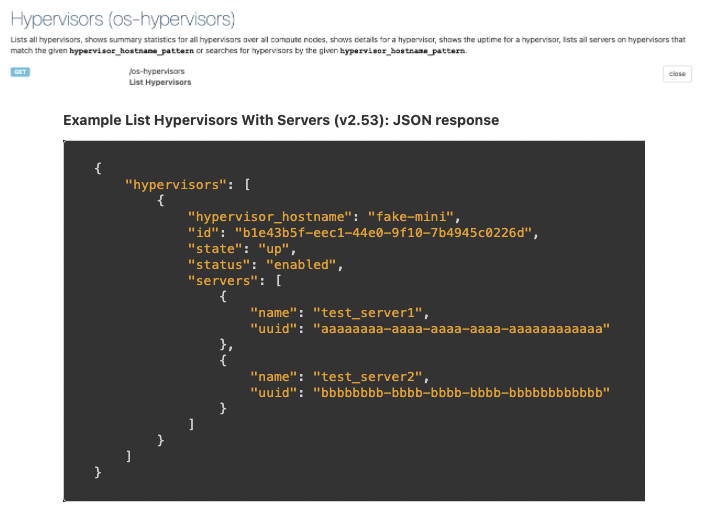
결론은 nova API Version이 달라서 ID 형태가 다르게 출력이 되는것이다!
4. Test Case
테스트 케이스는
openstackclient/tests/unit/compute/v2/test_hypervisor.py파일에TestHypervisorServersclass 추가와openstackclient/tests/unit/compute/v2/fakes.py안에class FakeHypervisor(object):를 수정해주었다.# test_hypervisor.py class TestHypervisorServers(TestHypervisor): def setUp(self): super(TestHypervisorServers, self).setUp() # 테스트를 하기전 먼저 기존에 만들어논 목업 데이터를 받아오는데 # 저는 여기에 servers라는 arg값을 추가를 해줬습니다. 이유는 아래에서 설명하겠습니다. self.hypervisors = compute_fakes.FakeHypervisor\ .create_hypervisors(servers=True) self.hypervisors_mock.search.return_value = self.hypervisors self.columns = ( "ID", "Name", "Hypervisor ID", "Hypervisor Hostname", ) # 비교할 데이터를 생성해주고 self.data = ( ( 'uuid1', 'inst1', self.hypervisors[0].id, self.hypervisors[0].hypervisor_hostname ), ( 'uuid1', 'inst1', self.hypervisors[1].id, self.hypervisors[1].hypervisor_hostname ), ) # Get the command object to test self.cmd = hypervisor.ListHypervisorServers(self.app, None) # 여기서 이제 목업 데이터와 서로 비교를 해줍니다. def test_hypervisor_servers(self): arglist = [ 'hypervisor-hostname-', ] verifylist = [ ('hostname', 'hypervisor-hostname-'), ] parsed_args = self.check_parser(self.cmd, arglist, verifylist) # In base command class ShowOne in cliff, abstract method take_action() # returns a two-part tuple with a tuple of column names and a tuple of # data to be shown. columns, data = self.cmd.take_action(parsed_args) # 데이터 비교하는 부분 self.assertEqual(self.columns, columns) self.assertEqual(self.data, tuple(data))# fakes.py class FakeHypervisor(object): """Fake one or more hypervisor.""" @staticmethod # servers라는 arg값을 받아오게 추가를 해준다. def create_one_hypervisor(attrs=None, servers=False): """Create a fake hypervisor. :param Dictionary attrs: A dictionary with all attributes :param bool servers: True if hypervisor has a servers :return: A FakeResource object, with id, hypervisor_hostname, and so on """ attrs = attrs or {} # Set default attributes. hypervisor_info = { 'id': 'hypervisor-id-' + uuid.uuid4().hex, 'hypervisor_hostname': 'hypervisor-hostname-' + uuid.uuid4().hex, 'status': 'enabled', 'host_ip': '192.168.0.10', 'cpu_info': { 'aaa': 'aaa', }, 'free_disk_gb': 50, 'hypervisor_version': 2004001, 'disk_available_least': 50, 'local_gb': 50, 'free_ram_mb': 1024, 'service': { 'host': 'aaa', 'disabled_reason': None, 'id': 1, }, 'vcpus_used': 0, 'hypervisor_type': 'QEMU', 'local_gb_used': 0, 'vcpus': 4, 'memory_mb_used': 512, 'memory_mb': 1024, 'current_workload': 0, 'state': 'up', 'running_vms': 0 } # servers라는 arg값이 있으면 실제 hypervisor에 인스턴스가 있는것처럼 # 목업 데이터를 추가를 해준다. # 만약 if문을 안걸어주면 모든 테스트 케이스에 인스턴스 정보들이 들어가서 테스트 케이스가 깨져버린다. if servers: hypervisor_info['servers'] = [ {'uuid': 'uuid1', 'name': 'inst1'} ] # Overwrite default attributes. hypervisor_info.update(attrs) hypervisor = fakes.FakeResource(info=copy.deepcopy(hypervisor_info), loaded=True) return hypervisor @staticmethod # 이 부분은 여러 hypervisor가 있는 테스트 케이스에 사용되는 부분이다. # 여기도 마찬가지도 servers 추가 def create_hypervisors(attrs=None, count=2, servers=False): """Create multiple fake hypervisors. :param Dictionary attrs: A dictionary with all attributes :param int count: The number of hypervisors to fake :param bool servers: True if hypervisor has a servers :return: A list of FakeResource objects faking the hypervisors """ hypervisors = [] for i in range(0, count): # 여기도 servers 추가 hypervisors.append(FakeHypervisor.create_one_hypervisor(attrs, servers)) return hypervisors이렇게 처음으로 테스트 케이스라는걸 짜보게되었고, 정말 고생을 많이했고 삽질도 많이했다….ㅎ